Archive for February, 2009

My 1/4 inch socket mysteriously re-appears

Monday, February 23rd, 2009

Well not exactly….

In my frustration with not being able to find the wretched socket, I was a bit “over-aggressive” with my playfield today. I was so frustrated and angry I shook the playfield (well pushed it up and down actually, but very forcibly and with short, sharp jerking movements – it must have looked funny to anyone watching) and then it happened….

The playfield started to rattle.

A few more shakes later and there was a clunking sound. Sure enough I had shaken the socket loose from wherever it had been stuck and then shaken it out of its location on the playfield and into the cabinet.

My socket was back! I just hope I haven’t ruined my machine in the process.

Pinball Perfect – Service not so!

Thursday, February 19th, 2009

Even though I’ve bought a new Apron for my TAF, it’s the wrong one (it’s a Hurricane) so needs some work doing to it in order to turn it into a TAF Apron (removing current decals, preparing it to paint, painting it black, applying TAF decals and then applying a lacquer finish).

Being lazy however, I continue to look for an actual TAF Apron and actually found a source at Pinball Perfect (www.pinball-perfect.de) in Böblingen, Germany. They actually offered me an Apron for 115 €uro – a little excessive methinks.

So, on a visit to Böblingen, I visited the said company and asked them whether it would be possible to negotiate a price.

Sure enough, from an old box, high up on one of their shelves they pulled out an old TAF Apron which looked a lot worse than my current one. Of course they could prepare this for me and on looking at the actual prices for a TAF Apron on the internet, concluded that I could actually have it for 70 €uro.

Well, this was still a bit excessive for me, so I declined.

Having returned home, I sent a follow-up email to Pinball Perfect, stating that as they had to prepare the apron, paint it, apply the decals and then clearcoat it, I would save them all that bother and expense and still give them 20 €uro for the original Apron.

Strangely, they declined my friendly offer, with the words: “unimaginable and therefore absolutely impossible!”

For a company that charges 48€ per hour for mechanical work, considering the amount of such work and the cost of decals plus paint that would be needed to repair the apron, it seems to me like this decision has not been made on a commercial basis, but rather based on G-R-E-E-D!

Dot Matrix Display controller board

Wednesday, February 18th, 2009
DMD Controller Board kit

DMD Controller Board kit

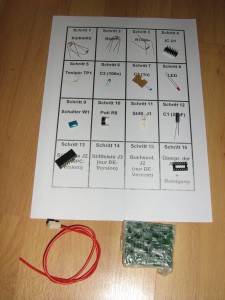
Received a DMD controller board today (in kit form) from my new friends at Flippermarkt.de. The idea of this kit is to not only regulate the overall brightness of the display (thereby extending its life) but also to allow easy fault detection (by simply switching on all pixels with the flip of a switch).

I’ll report on the results, as soon as I’ve built it up and connected it to the machine

My Pinball machine is haunted!!

Sunday, February 15th, 2009

I decided to remove the Thing Hand Box yesterday. I had already read (over months of research) that this was a difficult task, as there are three screws on the rear of the playfield which are securing the box. To get to these screws is near on impossible, as with the playfield in the fully upright position, it is difficult to get a tool underneath the playfield to take them off.

The solutions I have seen suggested, include pulling the playfield out of its mount and resting the front of the playfield on the front of the pinball body. Three reasons stopped me from doing this:

  1. The playfield is extremely heavy
  2. resting the playfield on the front of the body could potentially damage some of the wiring/mechanics on the underside of the playfield
  3. Even with the playfield moved forward by the recommended four inches would not expose the back of the playfield anyway

So I decided on the option of holding the playfield up at a 45 degree angle using the holding bar in the body (on the right side of the body). There is a round cut-out on the underside of the playfield that this bar fits into.

With the playfield in this position it was easier to get to the screws with a ratchet and 1/4 inch socket. It was hard but I managed to get two of the screws out but on removing the third screw, I managed to drop the socket inside the body. Lifting up the playfield into its vertical positon to search for the socket, I heard the socket fall down some more, but when I looked inside the box, the socket was no-where to be seen. It had vanished. I checked all the obvious places (loudspeaker magnet, transformer magnet etc); I checked all the corners inside the box (finding the other half of the broken blue target and the tip of a slingshot plastic in the process) but the socket was no-where to be seen! Even though there are no holes through which the socket could have fallen in the body of the pinball, I checked underneath the pinball machine, but with no luck.

My pinball machine is haunted with thieving ghosts! (This isn’t the first item that’s simply disappeared, incidentally: the first was a plastic spacer from the dot-matrix display).

A small tip at this point, I wouldn’t recommend searching inside the pinball box: everything is covered in the so-called “pinball dust” which gets everywhere. I had to wash five times in the search process and change my t-shirt twice, making the whole searching escapade that more frustrating.

But then came the icing on the cake: I discovered you don’t even need to take out these three screws at the back of the playfield to remove the Thing Hand box. At the most, you only need to loosen them slightly, as they secure a bracket which holds the Thing Hand box at the bottom (there are, in fact, just two screws securing the Hand box to the playfield). So this would have been a much easier (and quicker) task had I known this – and less frustrating!

I still haven’t found the socket as of today, and believe me, I’ve been looking!