What more plastics? No, not this time. As I mentioned in my post at the begining of April, I’m interested in replacing the plastic flasher caps in the machine which are rivetted on, with the screw-in cap flashers. Having already acquired the flasher bases for this job, it turns out that it isn’t a simple replacement. The hole required for the flasher cap and flasher bulb holder is slightly larger than the hole required for the riveted flasher assembly – although the holes for the rivets are almost in the same place.
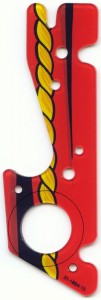
An example: Here is the top plastic for Thing’s Flipper showing the larger hole for the new flasher caps (using the same rivet holes):

Plastic for Thing's Flipper
Cutting a hole in the plastic the size of the new flasher cap would severely weaken the plastic and may even cause it to break. So the only option was to redesign the platic.
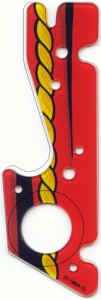
The redesign was made in CorelDRAW. From the above graphic, the outline was traced into a vector format and then a location found for the larger hole. Unfortunately the optimal location for the new hole, meant that the walls would still be thin, so that even this plastic version would be weak. So I decided to enlarge the plastic ever so slightly in both width and length:

Plastic showing new size
The optimal location for the hole was now chosen to maximise the wall thickness. Also the opportunity was taken to remove one of the holes, which served no purpose and also to move the backlighting lamp assembly to the bottom plastic. Moving the lamp to the bottom plastic would serve three purposes:
- To help with the mounting of the flasher unit
- To remove an unnecessary rivet from the top plastic
- To improve light distribution on the top plastic

New top plastic for Thing's Flipper
At the same time, the bottom plastic of the Thing Flipper plastic unit had to be changed. Not only was this done to match the new mounting holes with the top plastic and to relocate the backlighting bulb to the bottom, but also to cover the view into the opto sensor behind Thing’s flipper:

Lower plastic for Thing's Flipper
The Train Crash plastic and the Telephone plastic were much easier, as the external form for each was able to stay the same, just the best location for the larger hole had to be found.


