Archive for the ‘AFM’ Category

Cleaning the playfield mechanics

Wednesday, January 9th, 2013

I’ve spent the past few days cleaning the playfield mechanics, which meant taking them all apart, cleaning the bits and assembling them again.
IMG_0003

IMG_0001_2

IMG_0001_3

IMG_0002_1

IMG_0002_2
As an experiment, I sanded the diverter blade down to 600 grit (as with the lockbar) and was very happy with the result. It gives a mirror-like surface with fine horizontal scratches, which I like. I now plan to sand all exposed stainless steel parts down to 600 grit.

It’s “pat-on-the-back” time….

Sunday, January 6th, 2013

Before I start putting bits and pieces back onto the playfield, I thought I’d take stock of how far I’d actually come since May of last year, so to start, I thought I’d record the “before” and “after” pictures of my playfeld restoration:before-after

~~~~~~~~~~~~~~~~~~~

before-after2

~~~~~~~~~~~~~~~~~~~

before-after3
I’m quite happy with these results!

Finishing the playfield

Friday, January 4th, 2013

Even though I have had the playfield clear-coated and sanded five times (professionally!), even after the final coat, the clearcoat still sank around the inserts and could be felt to the touch. So I decided to try to flatten it once and for all, by sanding it with wet and dry sandpaper. Having investigated a bit on the internet, I decided to first sand with 600, then 800, then 1000, then 1200, then 1500, then 2000 and finally 3000 grit sandpaper. I was going to sand wet with water and a few drops of washing-up liquid, making sure to always sand in the same direction (along the length of the playfield).

After my first sanding with 600 grit paper, the surface naturally became dull. I took a photo at this stage and interestingly, the surface seemed glossy when taking a picture at an acute angle:

Playfield having sanded down with 600 grit sandpaper

Playfield having sanded down with 600 grit sandpaper


Two and a half hours later and I had finally got down to the last grit of sandpaper. I finished off the playfield with Novus 2 and then Finesse-It (both being applied with the special adapter for my electric drill). Having finished, the glossy shine was back, the surface felt flat and the playfield looked great:
Finished playfield. Nice!

Finished playfield. Nice!


But then on closer inspection of my work, I saw there were scratches all over the playfield which appeared to go in every direction, implying they weren’t from my sanding of the playfield. Also, they were quite long and straightish, implying that they weren’t caused by the rotary polisher (my drill) either.
An area of the playfield clearly showing scratches

An area of the playfield clearly showing scratches


To be honest, I was disappointed. But not knowing what I had done wrong, I couldn’t correct it. Posing the question on my local forum got me the response that the grit I had started with (600) had been too course. I should have started with the 1000 grit. Whether this was the actual problem though will have to be investigated during my next renovation, as I’m now dying to get this machine up and running as soon as possible. And unless you look really closely, it’s difficult to see the scratches……

Cabinet finished!

Friday, December 7th, 2012

Well, I actually got the cabinet finished today – including attaching the backbox. See for yourself how it turned out, but I’m happy!

Finished Cabinet and Backbox

Finished Cabinet and Backbox

From a different angle showing the inside. Note missing Start button

From a different angle showing the inside. Note missing Start button

(PS actually, the Start button is missing – I’m still waiting for that to came from the US – Jay??)

Lockbar

Sunday, December 2nd, 2012

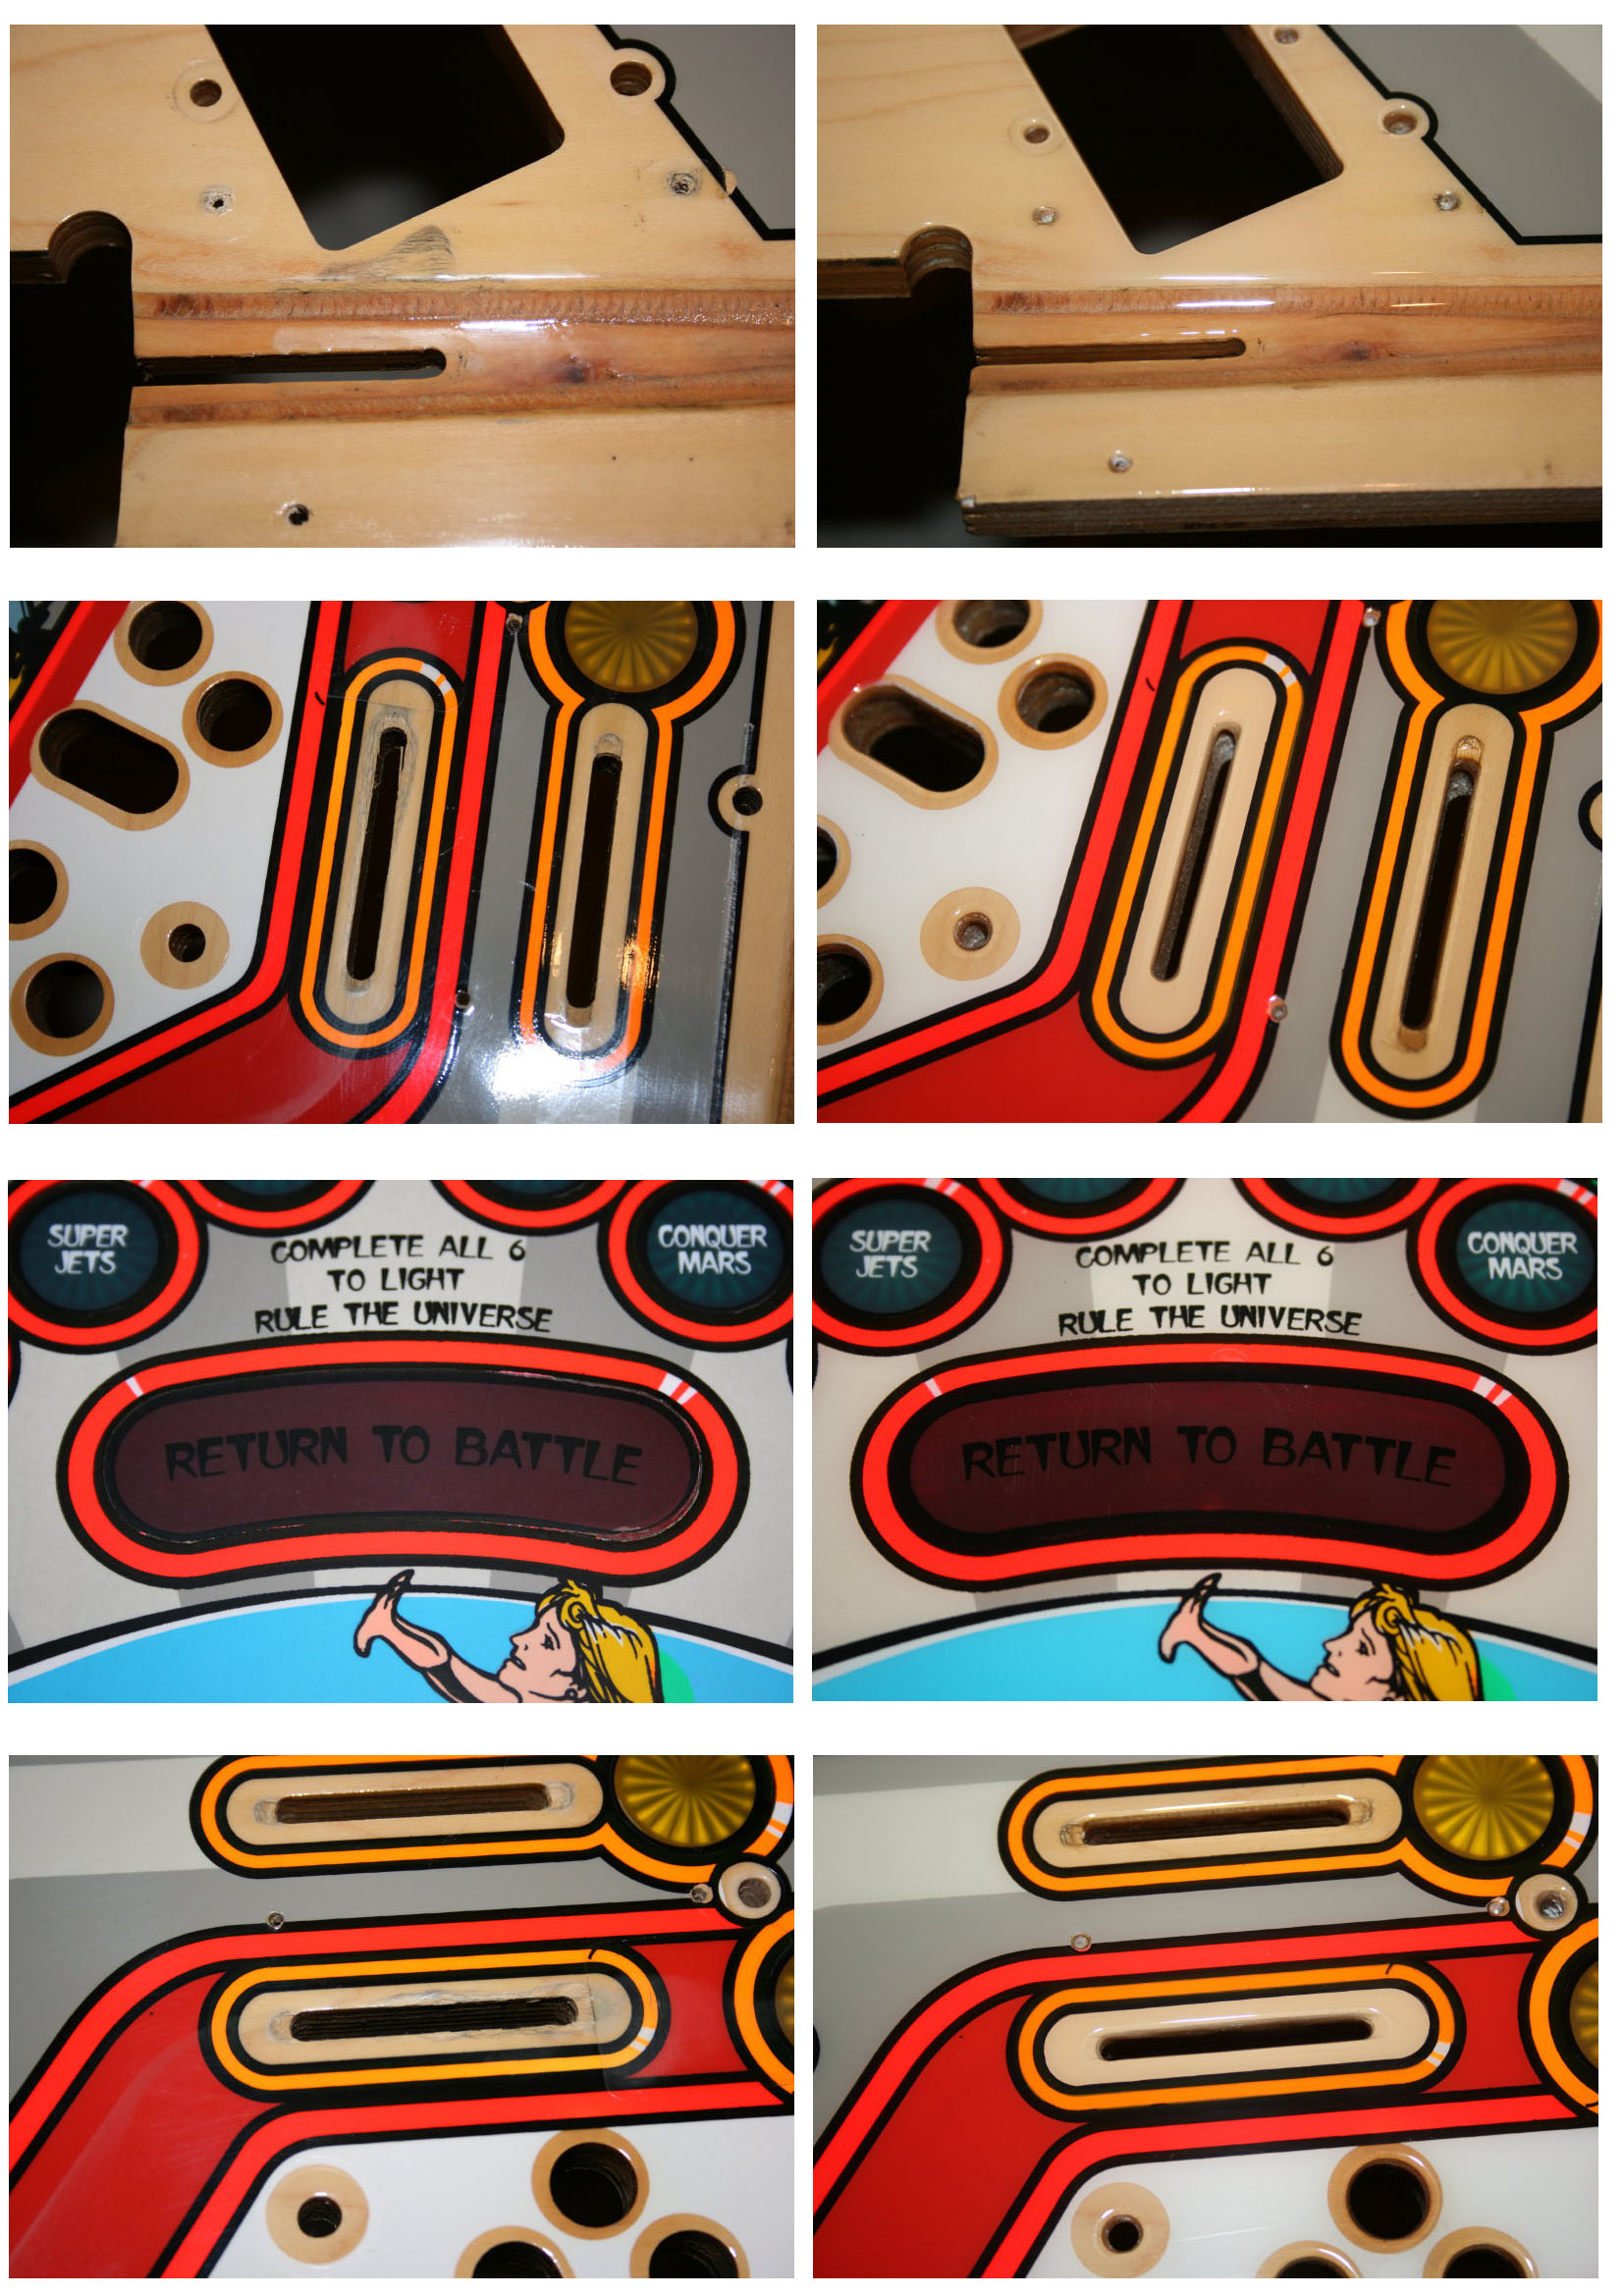
The lockbar came under the spotlight today. The top surface was scratched really badly and underneath was a disaster – the stainless steel being stained a brown colour and the beer seal being crispy from what must have been years of abuse!

Condition of lockbar (below) originally

I wasn’t going to do much with the lockbar apart from clean the underside and replace the beer seal. However, quite recently on my local forum, there have been threads concerning the polishing of stainless steel parts. The results have been really impressive, so that I’m now considering polishing my stainless steel parts also. It turns out that the lockbar is also stainless steel, which means that I could actually practise polishing stainless steel using the lockbar as my test piece. After all, if it went wrong, I could simply buy a new one.

So firstly, I took some 120 grit sandpaper and sanded out as many scatches as I possibly could from the lockbar, remembering to sand only along the grain in one direction. Once I thought I had removed most of the scratches I moved onto 400 grit paper and continued to sand in the same direction, until the surface appeared uniform. Next was 600 grit, which I used wet, once again remembering to sand in the same direction.

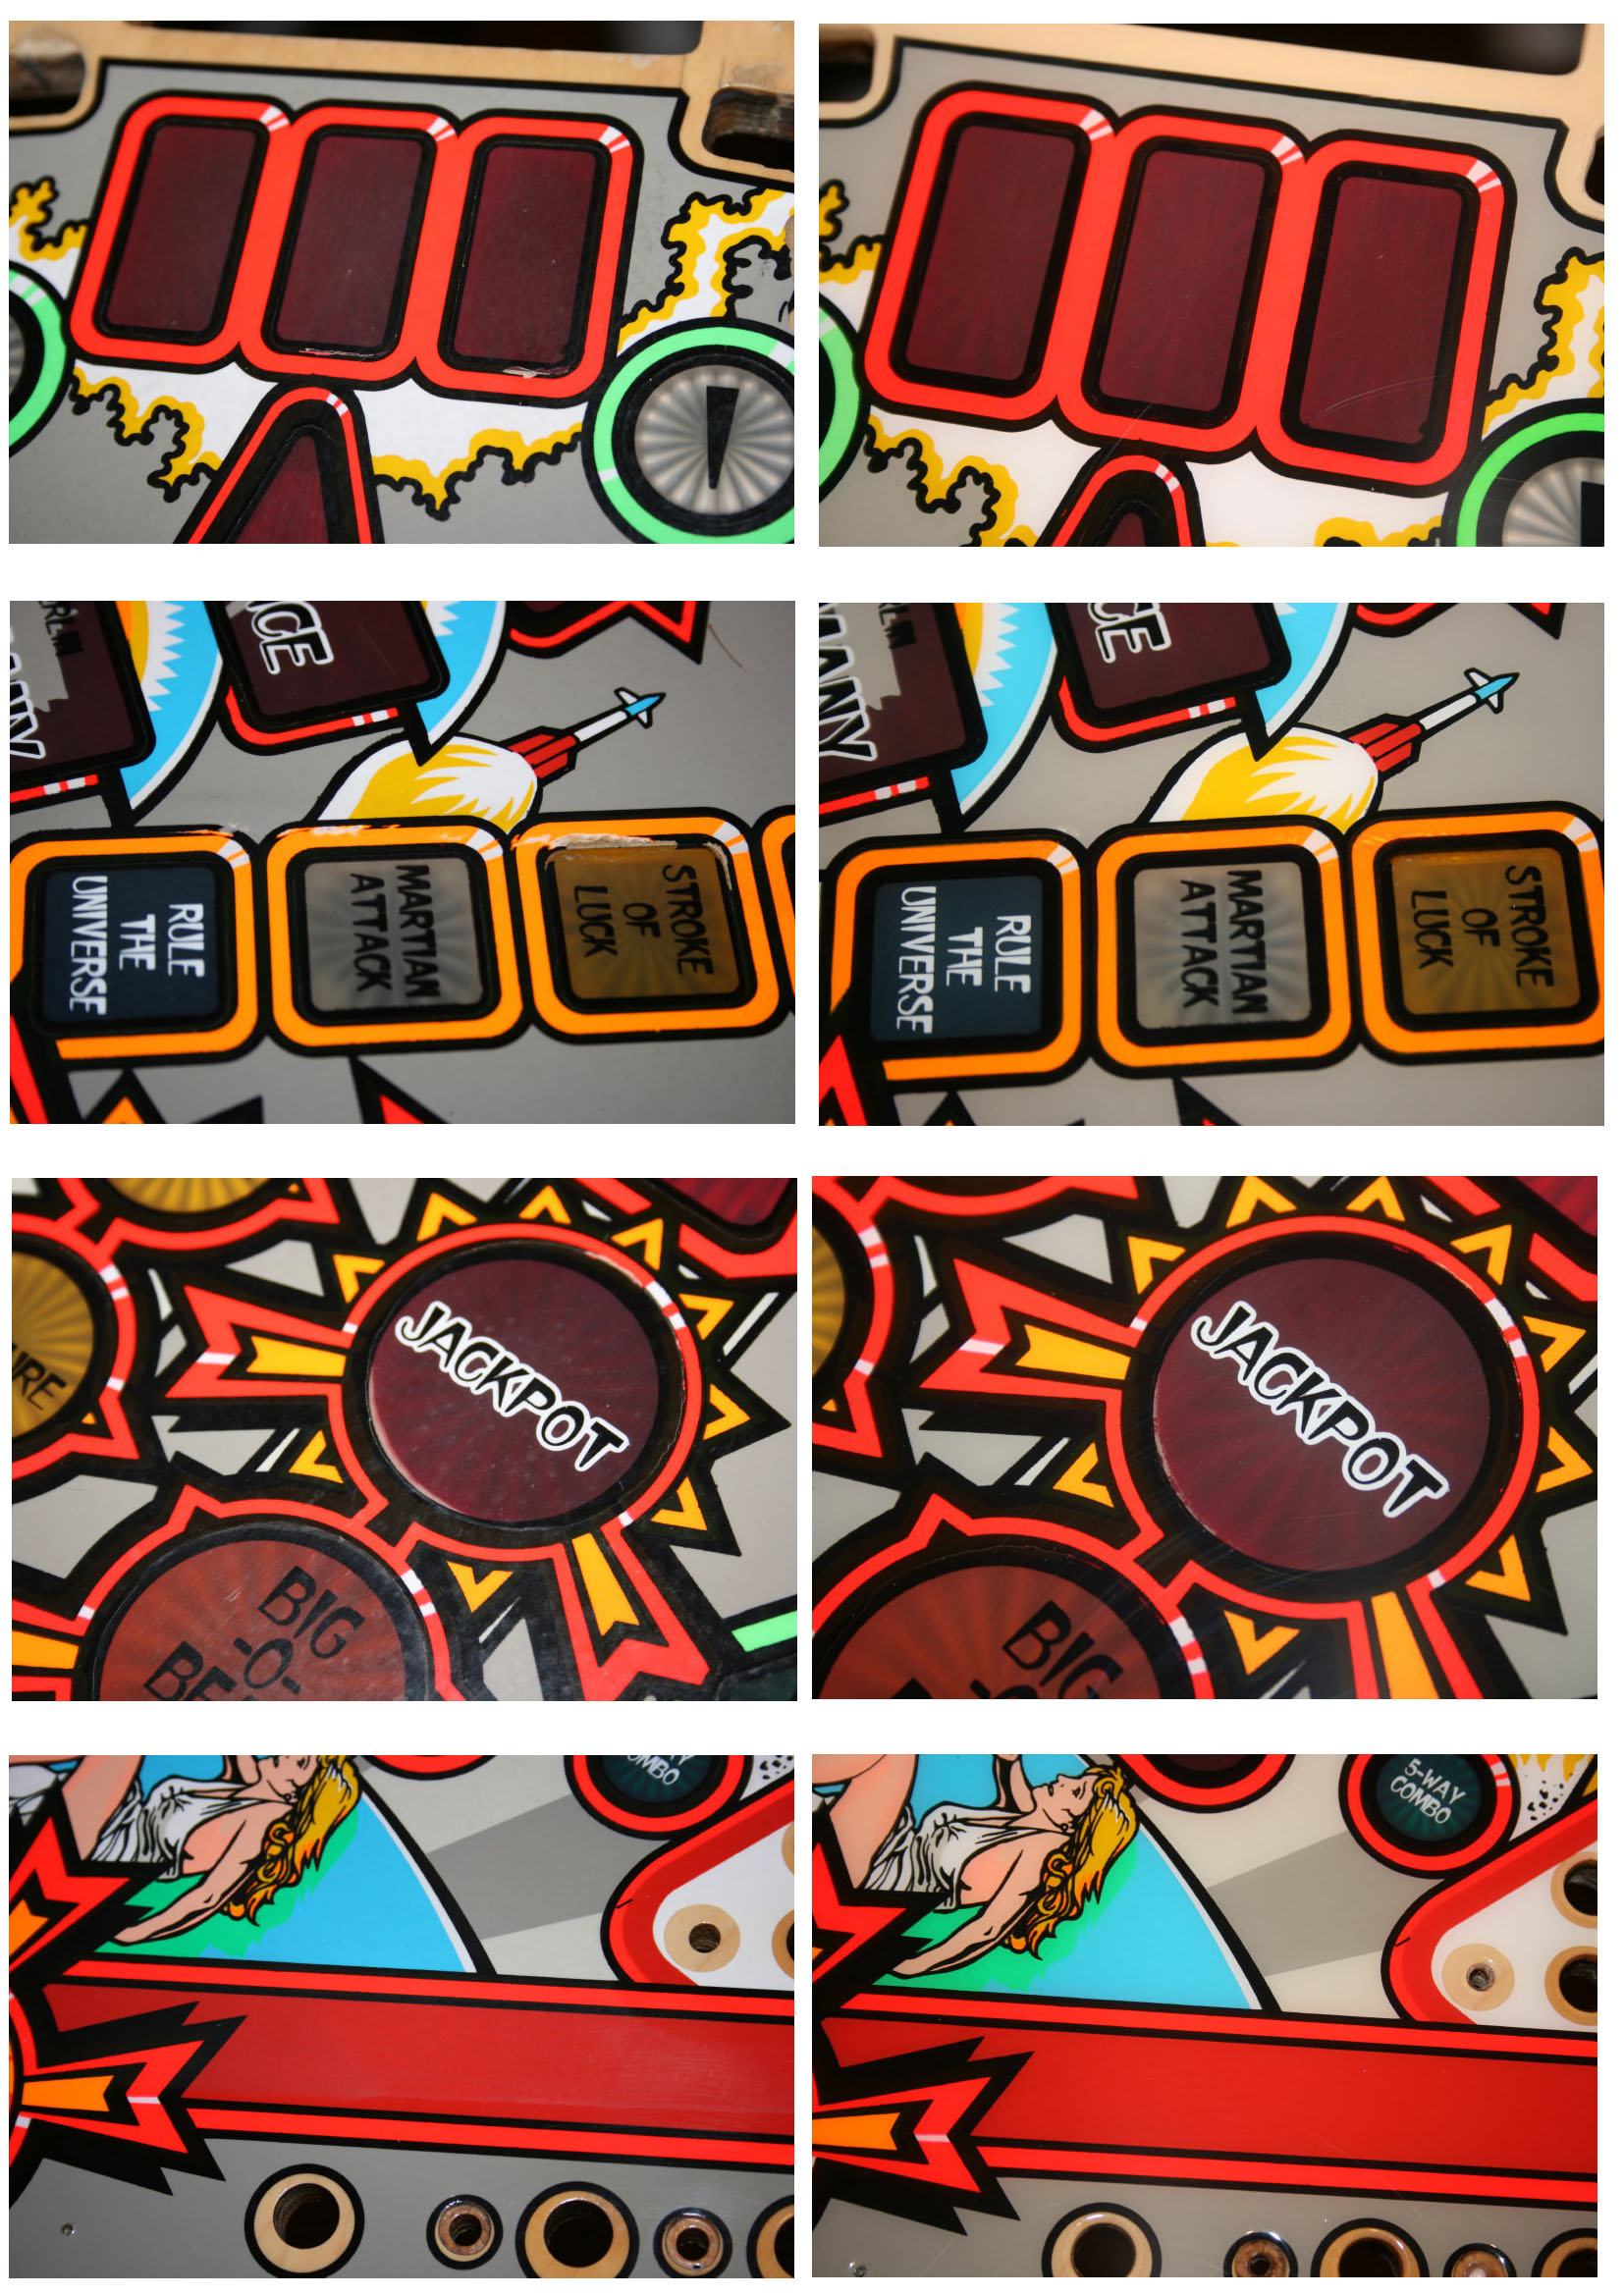
After over 2 hours of sanding and sweating I was done. And this is how it turned out:

Lockbar sanded to 600 grit


I was amazed at how good it looked! I was really tempted to take it down to 800 grit and then 1000, but close inspection of the lockbar shows that I didn’t get rid of all the initial scratches, meaning that if I went to a finer grit those scratches would become more obvious. And if it turned out really nice, I would then be over protective of my lockbar and probably not allow anyone to play the game! Finally, bearing in mind that although new, the side rails are also not highly polished, so the difference between lockbar and side rails might look silly if too extreme.

Next came the underside. Using fat remover I was able to clean up the underneath quite well and the crystalised beer seal came of reasonably easily. In trying to clean up the zinc plated retainer, however, I managed to remove some zinc plating. Not wanting the retainer to rust any time soon I decided to spray paint it with zinc paint.

It turns out, however, that this spay paint doesn’t like cold temperatures and should be applied with an ambient temperature of above 20 deg C. Well it’s 1 deg C outside these days – with the onset of winter – so that I couldn’t go into the garage to spray the part. So I make-shifted a spray cabin and sprayed in the cellar:

Lockbar all wrapped up, exposing the zinc plated retainer, in a portable spray cabin (a cardboard box)

And the results, having added a new beer seal, weren’t bad either:

Underside of lockbar with freshly sprayed retainer

What’s this for?

Tuesday, November 27th, 2012

Whilst putting the cabinet back together again, I came across a part which mystified me. Do I really need to put it back in place:

What's this part do?

A close-up of the mysterious part

Time to go on the forums to ask this very question.

I got some interesting responses, from “it’s to help balance the machine”, to “it’s to make the wood sound thicker, so that thieves who want to break in to the machine believe that the wood is 7cm thick instead of just 2cm” to “it’s to prevent anyone from releasing the lockbar by going in through the Start button”.

All of which were incorrect, as it turns out.

The actual answer was to be found on Pinside. Lloyd Olson had once written on RGP that these “cabinet blocks” were there to “Keep the playfield from sliding to the front of the cabinet in shpping, bending the playfield hangers.”

Question answered. Thanks Lloyd!

Coin Door

Tuesday, November 20th, 2012

The coin door that came with the machine had a Coin Controls 220 coin mechanism and bracket in it. But I want to use an NRI coin validator as I’ve had it programmed to take tokens. Unfortunately it is not possible to put an NRI coin validator in the C220 bracket, meaning that I’ve had to find a new door.

I had a three channel coin door given to me, so having taken it apart and sprayed it with Hammerite Hammer Finish paint, I was all ready to put the coin door back together, when I came across a better solution:

I had acquired an NBA Fastbreak (to use as a donor machine for my AFM – although I won’t be scapping it – more about this later) and the coin door on that was just what I had been looking for – single channel with an NRI type of bracket and, most importantly, in good condition. The door was slightly dented at the side and there was some surface rust on a few of the parts and a few paint chips, but all in all an excellent basis for my nice new coin door.

There was just one slight problem: although the bracket was the correct one for the NRI the retaining mechanism was missing. However, I managed to find a two part retaining mechanism in my ST:TNG the bottom part of which I had to adapt, so that it fit in the bracket:

NRI coin validator in bracket without retaining mechanism

The new two-part retainer showing where I had to adapt the lower part, so that the NRI mechanism would fit

Not only was the retainer missing, but also the locking mechanism, which attaches to the key cylinder. Here’s how they both should look:

An example of the missing locking mechanism and the coin validator retainer

All in all, though, the door wasn’t too bad:

Rear view of the "new" coin door

Just look at that tilt-mechanism!

Slam-Tilt mechanism. 10/10 for artistic impression!

A few rust patches

So on with the renovating.

First up was taking everything off of the old door and taking loads of pictures. Then I cleaned all parts with a fat-remover (Breff Fettlöser). I removed all rust patches using a fibre glass pen, so as not to disturb too much of the good paint. I then treated the bare metal (where the rust had been) with rust coverter. Once that had dried I sanded the areas down slightly and then cleaned all parts with Isopropyl Alchohol. I finally sprayed all parts with satin black Restoleum Painter’s Touch and let it all dry before putting the coindoor back together again. I also managed to get a locking mechanism from a member of my favourite pinball forum in Germany – Thanks Andreas.

The result:

Front of renovated coin door. Note you can still see the famous Williams paint structure

Back side of the renovated door with lock mechanism and retainer

Disaster strikes – yet again!

Thursday, November 15th, 2012

A bit of cleaning was undertaken today, with the ultrasonic cleaner. I used it to clean the bits and pieces from the cabinet door and various bits and pieces for the cabinet.

In attempting to take the “Launch Ball” button apart to clean it thoroughly, I broke the disc with the text on it:

Broken disk

These discs can’t be bought separately (only the entire button assembly with plastic housing, switch and lamp) so I tried to repair it using Pro-Weld (which melts the parts together instead of sticking them and should therefore gives a stronger bond) and touching up the text:

Repaired disc

Touched up

Finished article

Although not perfect, the button looks a lot better than it did. However unfortunately light shining from the back shows the two cracks, meaining that I’m going to have to think of another solution.

So I’m currently looking to see whether any pinheads have an old button which they don’t need (in any condition). As this button is used on Attack from Mars, Champion Pub, Demolition Man, Dracula (Williams), Johnny Mnemonic, Medieval Madness, Monster Bash & Popeye I might be lucky…

If not, I could always try making my own – the problem here being that the disc would have to be made in such a way, so that the light from the bulb is dispersed evenly across the entire surface area of the disc – not an easy task!

UPDATE: It turns out that I didn’t break the disc after all. By scrutinising the photos I had taken of the disassembly process, the cracks were clearly visible in the Launch Ball button having taken it off of the cabinet. Makes me feel a lot better:

Photo of Lauch Button taken at time of disassembly. The cracks are clearly visible.


Considering these buttons cost less than 6 dollars at MAD Amusements (US) I just bought a new one (and sold this one to a pinhead in Germany for half the price).

Building up the cabinet

Wednesday, November 14th, 2012

Mounted a few bits and pieces today, starting with the support bar. Had to cut away some of the decal around the screw head in order to avoid the decal rippling, as happened on the head (reported earlier):

Decal cut-away for support bar screw

Having mounted the bar and a few stickers it started to look promising:

Support bar and new stickers

Next was the tansformer and isolating plate:

Transformer mounted

And that was it for the day.

Wireloom labels

Monday, November 5th, 2012

I was inspecting one of the cable looms yesterday and although I had cleaned it, the sticky label around it, with the part number on it, had collected dirt and looked awful.

When I removed the cable originally, I was planning to leave it like this, but yesterday it looked a lot worse, for some reason. So, off with the old:

Old and dirty cable loom lable - ready for scanning

I scanned in the label, reproduced the barcode in Code 39 format, using the Barcodes Inc website; squished and squashed a font in Photoshop until it closely matched the font used on the label; printed the label out on normal white paper; cut the outline of the label using my plotter; cut the same outline on some matt clear sticky paper; cut the paper label in half and stuck the printed half to the back of the sticky foil, et voilá:

New set of labels for the three wirelooms

Because of the amount of time it had taken to duplicate the font and find the right source and format for the barcode, I finished off making all three labels for each of the looms.

Finicky, or what?